
This guide is for site administrators using IXCDN Console for the first time. You do not need to understand CDN internals; follow the steps to connect a domain, enable HTTPS, configure caching and check logs.
Available controls may vary by account, plan and service region. Treat the status and guidance shown in Console as authoritative.
Rollout path
A standard onboarding has six stages:
- Add the domain and origin.
- Verify domain ownership.
- Point the business domain to its CNAME.
- Validate TLS and origin connectivity.
- Configure caching and WAF policy.
- Confirm the rollout through logs, status codes and usage.
Start with a test hostname or a lower-risk production hostname. Validate the complete path before moving primary traffic.
1. Sign in and check the account
Open IXCDN Console. If there is no active session, you will be sent to the sign-in page.
Before onboarding a domain, confirm:
- the active account and language;
- permission to manage domains;
- any usage, balance or service-limit notice;
- security recommendations such as MFA or a password update.
2. Add a domain
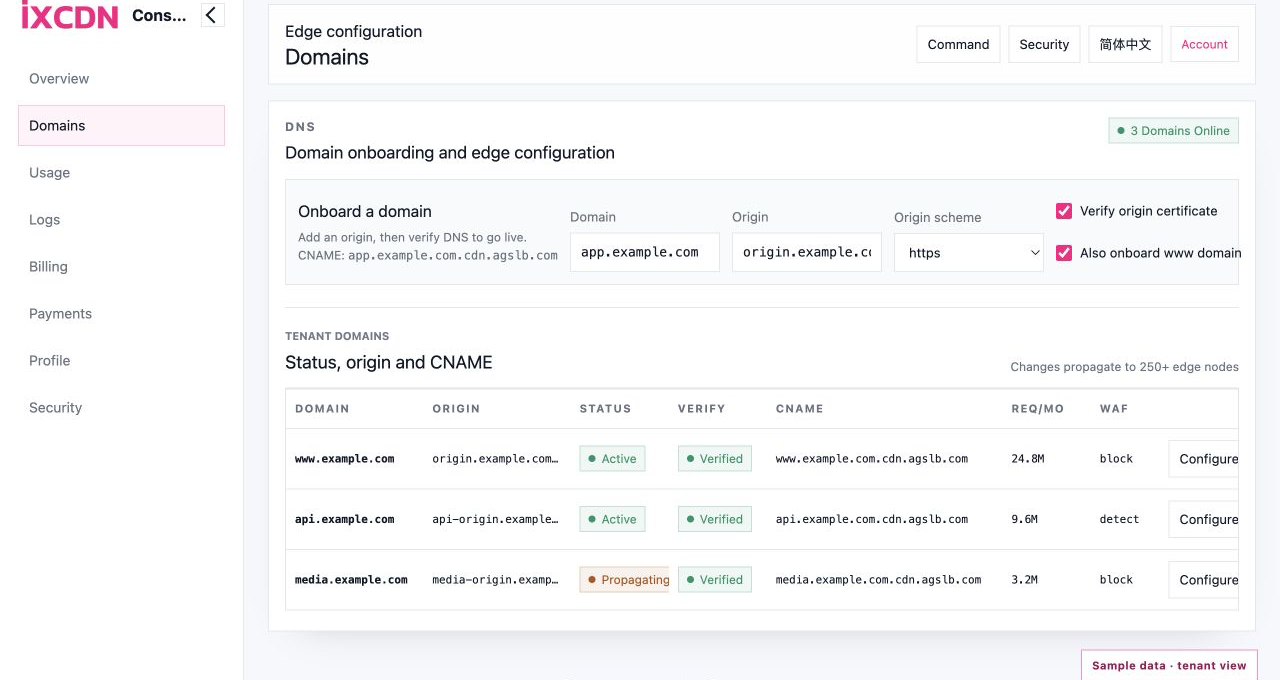
Open Domains and find the domain onboarding form.
Provide:
- Domain: for example,
app.example.com; - Origin: an origin hostname or
IP:port; - Origin scheme: HTTP or HTTPS, matching the service at origin;
- Verify origin certificate: keep this enabled for HTTPS origins;
- Also add www: use this when the root and
wwwhostnames should be onboarded together.
The domain does not become Active immediately. IXCDN first verifies ownership so another account cannot onboard a domain it does not control.
3. Verify domain ownership
Open the new domain. Console displays the DNS TXT record required for verification. Add the exact record name and value at the authoritative DNS provider for the domain.
After DNS propagation, return to Console and run the verification check. Typical states are:
pending: waiting for verification;verified: ownership has been confirmed;failed: the record was not found or did not match.
If verification fails, check that the record was added to the correct DNS zone, whether the provider automatically appended the zone name, and whether the TXT value contains additional quotes or spaces.
4. Point the CNAME and watch propagation
After verification, Console provides a dedicated alias ending in cdn.agslb.com, for example:
app.example.com.cdn.agslb.comAt the DNS provider for the business domain, point app.example.com to the complete alias shown in Console. Do not guess or shorten the target.
The domain may move through pending_dns, propagating and active. Keep the existing origin entrance available until resolution has been confirmed from the regions that matter to the service.
5. Validate origin connectivity and TLS
Open the domain’s Connection and TLS views. Check:
- origin address and port;
- HTTP or HTTPS origin scheme;
- origin certificate verification;
- origin SNI when required;
- redirect behavior from visitor HTTP to HTTPS;
- edge certificate status and validity.
If the origin uses a self-signed certificate, avoid treating disabled verification as a permanent fix. Prefer a valid origin certificate or contact support to plan a private-origin arrangement.
6. Configure caching
Open Cache. Begin with a conservative policy:
- cache static assets;
- decide whether HTML or API responses are safe to cache;
- bypass personalized paths such as login, checkout and account pages;
- start with a reasonable default TTL and tune it with observed results;
- invalidate affected content when a release requires it.
Use Usage to watch cache hit ratio and origin traffic. A low hit ratio is not automatically a failure, but static content that always returns to origin usually deserves a review of response headers, cache policy and URL parameters.
7. Observe WAF events before blocking
Open Security and select a WAF policy for the domain.
A controlled rollout is:
- Start in
detectmode. - Review matched paths, client IPs and actions in WAF events.
- Address clear false positives.
- Move to
blockafter normal application behavior has been confirmed.
Do not select the strictest setting simply because it sounds safer. The policy needs to fit the application’s API formats, upload behavior and legitimate requests.
8. Troubleshoot with logs
Open Logs, select a domain and time range, then use the main query controls or column-header filters for:
- status code;
- request path;
- client IP;
- HTTP method;
- cache status;
- edge node.
Access logs explain what happened. Status distribution shows whether a problem is concentrated. WAF events indicate whether security policy acted on the request.
A useful investigation sequence is:
- isolate 4xx or 5xx responses;
- check whether failures cluster around one path;
- compare cache status and edge node;
- review WAF events for a matching security action;
- for 5xx responses, verify origin health and connectivity.
9. Review usage and billing
Use Usage for requests, egress, cache hit ratio and top domains. Use Billing for the current billing period, balance or plan state.
During the first week after rollout, review:
- whether egress matches expectations;
- whether cache hit ratio is stable;
- whether 4xx or 5xx responses are increasing;
- whether unusual IPs, paths or nodes appear;
- whether usage is approaching a budget or service limit.
Go-live checklist
- Domain ownership is verified.
- The business domain points to the complete alias shown in Console.
- Domain status is Active.
- HTTP and HTTPS behave as intended.
- Origin certificate verification succeeds.
- Dynamic and personalized paths are not cached incorrectly.
- WAF has completed an observation period in detect mode.
- Logs show real requests, status codes and cache outcomes.
- Usage and billing state are healthy.
- The previous origin entrance remains available until the rollout is stable.
For the platform overview, read The IXCDN edge advantage.